这里不讲 javascript 及 vue 基础,只讲使用。
vue-cli 创建项目
安装
注意:Vue CLI 需要 Node.js 8.9 或更高版本。
npm install -g @vue/cli
创建项目
命令行创建
vue create hello-world
图形化界面
vue ui
cli 服务
为了更好的理解,需要先看一下 package.json 的说明文档。
{
  // 包名
  "name": "hello-world",
  // 包的当前版本
  "version": "0.1.0",
  // 如果你不想你的包发布到包管理器(npm 或者 私有包管理),设置为 true
  "private": true,
  // 可执行脚本
  "scripts": {
    "serve": "vue-cli-service serve",
    "build": "vue-cli-service build",
    "lint": "vue-cli-service lint"
  },
  // 包的开发版和发布版都需要的依赖
  "dependencies": {
    "core-js": "^2.6.5",
    "vue": "^2.6.10",
    "vue-router": "^3.0.3",
    "vuex": "^3.0.1"
  },
  // 包开发期间需要,但是生产环境不会被安装的包
  "devDependencies": {
    "@vue/cli-plugin-babel": "^3.9.0",
    "@vue/cli-plugin-eslint": "^3.9.0",
    "@vue/cli-service": "^3.9.0",
    "@vue/eslint-config-standard": "^4.0.0",
    "babel-eslint": "^10.0.1",
    "eslint": "^5.16.0",
    "eslint-plugin-vue": "^5.0.0",
    "node-sass": "^4.9.0",
    "sass-loader": "^7.1.0",
    "vue-template-compiler": "^2.6.10"
  },
  // eslint 配置
  "eslintConfig": {
    "root": true,
    "env": {
      "node": true
    },
    "extends": [
      "plugin:vue/essential",
      "@vue/standard"
    ],
    "rules": {},
    "parserOptions": {
      "parser": "babel-eslint"
    }
  },
  // postcss 配置
  "postcss": {
    "plugins": {
      "autoprefixer": {}
    }
  },
  // 浏览器兼容性
  "browserslist": [
    "> 1%",
    "last 2 versions"
  ]
}
2
3
4
5
6
7
8
9
10
11
12
13
14
15
16
17
18
19
20
21
22
23
24
25
26
27
28
29
30
31
32
33
34
35
36
37
38
39
40
41
42
43
44
45
46
47
48
49
50
51
52
53
54
55
56
57
58
59
60
更完整的 package.json说明文档 。
"scripts": {
  "serve": "vue-cli-service serve", // 用于起服务
  "build": "vue-cli-service build", // 打包文件
  "lint": "vue-cli-service lint" // 代码格式验证及代码格式化
}
2
3
4
5
可以通过 npm 或 Yarn 调用这些 script:
npm run serve
# OR
yarn serve
2
3
详细的使用教程请参考 vue-cli官网 。
vue
基础知识
平常使用:
<!-- public/index.html -->
<div id="app"></div>
2
// main.js

// 可以 import 引入组件或者插件

new Vue({
  router,
  store,
  render: h => h(App)
}).$mount('#app')
2
3
4
5
6
7
8
9
<template>
<!-- 书写模板 -->
</template>

<script>
// 可以 import 引入组件

export default {
  // 定义组件名称
  name: '',
  // 混入
  mixins: [],
  // Vue 实例可用组件的哈希表
  components: {},
  // prop
  props: {
    // 基础的类型检查 (`null` 和 `undefined` 会通过任何类型验证)
    propA: Number,
    // 多个可能的类型
    propB: [String, Number],
    // 必填的字符串
    propC: {
      type: String,
      required: true
    },
    // 带有默认值的数字
    propD: {
      type: Number,
      default: 100
    }
  },
  // 数据
  data () {
    return {
      qrcodeSize: 0
    }
  },
  // 计算属性
  computed: {},
  // 生命周期钩子
  beforeCreate(){},
  created(){},
  beforeMount(){},
  mounted(){},
  beforeUpdate(){},
  updated(){},
  activated(){},
  deactivated(){},
  beforeDestroy(){},
  destroyed(){},
  // 方式
  methods: {},
  // 侦听器
  watch: {}
}
</script>
<style scoped>
/* 书写样式 */
</style>
2
3
4
5
6
7
8
9
10
11
12
13
14
15
16
17
18
19
20
21
22
23
24
25
26
27
28
29
30
31
32
33
34
35
36
37
38
39
40
41
42
43
44
45
46
47
48
49
50
51
52
53
54
55
56
57
58
59
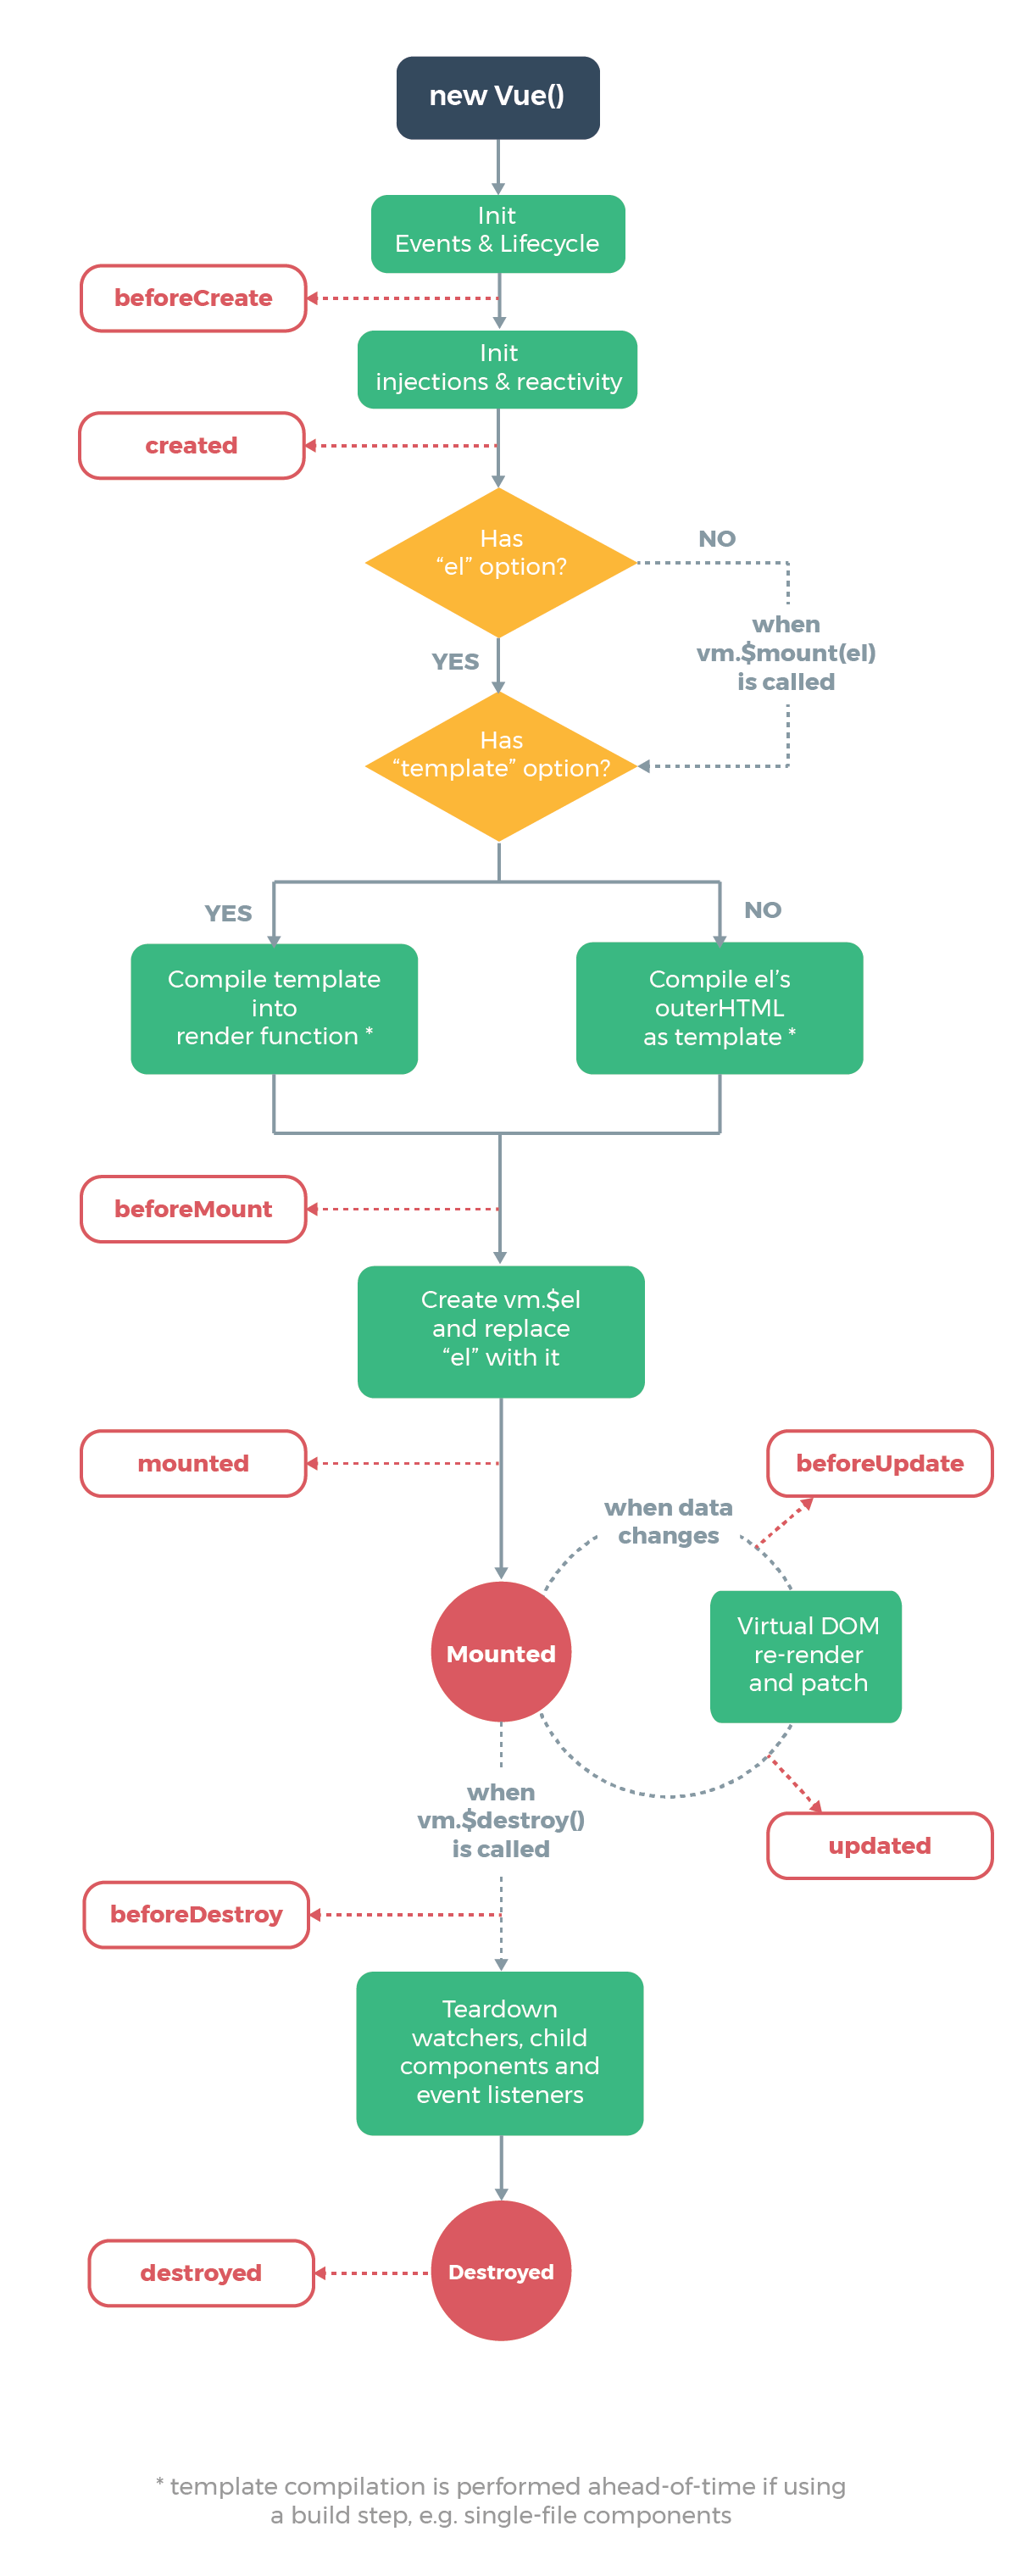
生命周期
Vue.js 组件的基础 API
mixins
mixins 选项接受一个混入对象的数组。这些混入实例对象可以像正常的实例对象一样包含选项,他们将在 Vue.extend() 里最终选择使用相同的选项合并逻辑合并。举例:如果你的混入包含一个钩子而创建组件本身也有一个,两个函数将被调用。
Mixin 钩子按照传入顺序依次调用,并在调用组件自身的钩子之前被调用。
var mixin = {
  created: function () { console.log(1) }
}
var vm = new Vue({
  created: function () { console.log(2) },
  mixins: [mixin]
})
// => 1
// => 2
2
3
4
5
6
7
8
9
属性 prop
prop 定义了组件有哪些可配置的属性,一般父组件通过 prop 向子组件传递数据。
例如 button :
props: {
  type: {
    type: String,
    default: 'default'
  },
  size: String,
  icon: {
    type: String,
    default: ''
  },
  nativeType: {
    type: String,
    default: 'button'
  },
  loading: Boolean,
  disabled: Boolean,
  plain: Boolean,
  autofocus: Boolean,
  round: Boolean,
  circle: Boolean
}
2
3
4
5
6
7
8
9
10
11
12
13
14
15
16
17
18
19
20
21
插槽 slot
Vue 实现了一套内容分发的 API,将 <slot> 元素作为承载分发内容的出口。
在自定义组件开始和闭合标签之间的内容,会相应的作用于组件内的 <slot> 位置处。
例如:
<el-container>
  <el-header>Header</el-header>
  <el-main>Main</el-main>
</el-container>
2
3
4
所以最终渲染效果
<section class="el-container is-vertical">
  <!-- <el-header>Header</el-header>
  <el-main>Main</el-main> -->
  <header class="el-header" style="height: 60px;">Header</header>
  <main class="el-main">Main</main>
</section>
2
3
4
5
6
在 js 中可以通过 $slots 来访问,每个具名插槽 有其相应的属性 (例如: v-slot:foo 中的内容将会在 vm.$slots.foo 中被找到)。default 属性包括了所有没有被包含在具名插槽中的节点,或 v-slot:default 的内容,在vm.$slots.default 中被找到。
例如:
<blog-post>
  <template v-slot:header>
    <h1>About Me</h1>
  </template>

  <p>Here's some page content, which will be included in vm.$slots.default, because it's not inside a named slot.</p>

  <template v-slot:footer>
    <p>Copyright 2016 Evan You</p>
  </template>

  <p>If I have some content down here, it will also be included in vm.$slots.default.</p>.
</blog-post>
2
3
4
5
6
7
8
9
10
11
12
13
Vue.component('blog-post', {
  render: function (createElement) {
    var header = this.$slots.header
    var body   = this.$slots.default
    var footer = this.$slots.footer
    return createElement('div', [
      createElement('header', header),
      createElement('main', body),
      createElement('footer', footer)
    ])
  }
})
2
3
4
5
6
7
8
9
10
11
12
如果自定义组件内部包含 <slot> 元素,则该组件起始标签和结束标签之间的任何内容都会被抛弃。
自定义事件 event
先看一个例子,自定义一个 button 组件
<template>
  <button @click="handleClick">
    <slot></slot>
  </button>
</template>
<script>
export default {
  name: 'MyButton',
  methods: {
    handleClick (event) {
      this.$emit('click', event);
    }
  }
}
</script>
2
3
4
5
6
7
8
9
10
11
12
13
14
15
通过 $emit,就可以触发自定义的事件 click ,在父级通过 @click 来监听:
<my-button @click="btnClick"></my-button>
$refs
一个对象,持有注册过 ref 特性 的所有 DOM 元素和组件实例。
<template>
  <input ref="input">
  <base-input ref="usernameInput"></base-input>
</template>
<script>
...
export default {
  created(){
    console.log(this.$refs.input)
    console.log(this.$refs.usernameInput)
  }
}
</script>
2
3
4
5
6
7
8
9
10
11
12
13
$options
用于当前 Vue 实例的初始化选项。需要在选项中包含自定义属性时会有用处。
new Vue({
  customOption: 'foo',
  created: function () {
    console.log(this.$options.customOption) // => 'foo'
  }
})
2
3
4
5
6
一般用于组件判断,比如 https://github.com/ElemeFE/element/blob/dev/packages/radio/src/radio.vue#L83。
$parent / $children
$parent 父实例,如果当前实例有的话。
$children 当前实例的直接子组件。需要注意 $children 并不保证顺序,也不是响应式的。如果你发现自己正在尝试使用 $children 来进行数据绑定,考虑使用一个数组配合 v-for 来生成子组件,并且使用 Array 作为真正的来源。
组件通信
$on 与 $emit
$emit 会在当前组件实例上触发自定义事件,并传递一些参数给监听器的回调,一般来说,都是在父级调用这个组件时,使用 @on 的方式来监听自定义事件的,比如在子组件中触发事件:
// child.vue,部分代码省略
export default {
  methods: {
    handleEmitEvent () {
      this.$emit('test', 'Hello Vue.js');
    }
  }
}
2
3
4
5
6
7
8
在父组件中监听由 child.vue 触发的自定义事件 test:
<!-- parent.vue,部分代码省略-->
<template>
  <child-component @test="handleEvent">
</template>
<script>
  export default {
    methods: {
      handleEvent (text) {
        console.log(text);  // Hello Vue.js
      }
    }
  }
</script>
2
3
4
5
6
7
8
9
10
11
12
13
这里看似是在父组件 parent.vue 中绑定的自定义事件 test 的处理句柄,然而事件 test 并不是在父组件上触发的,而是在子组件 child.vue 里触发的,只是通过 v-on 在父组件中监听。既然是子组件自己触发的,那它自己也可以监听到,这就要使用 $on 来监听实例上的事件,换言之,组件使用 $emit 在自己实例上触发事件,并用 $on 监听它。
示例 :
<template>
  <div>
    <button @click="handleEmitEvent">触发自定义事件</button>
  </div>
</template>
<script>
  export default {
    methods: {
      handleEmitEvent () {
        // 在当前组件上触发自定义事件 test,并传值
        this.$emit('test', 'Hello Vue.js')
      }
    },
    mounted () {
      // 监听自定义事件 test
      this.$on('test', (text) => {
        window.alert(text);
      });
    }
  }
</script>
2
3
4
5
6
7
8
9
10
11
12
13
14
15
16
17
18
19
20
21
$on 监听了自己触发的自定义事件 test,因为有时不确定何时会触发事件,一般会在 mounted 或 created 钩子中来监听。
provide / inject
这对选项需要一起使用,以允许一个祖先组件向其所有子孙后代注入一个依赖,不论组件层次有多深,并在起上下游关系成立的时间里始终生效。
provide 选项应该是一个对象或返回一个对象的函数。该对象包含可注入其子孙的属性。
inject 选项应该是:
- 一个字符串数组,或
- 一个对象,对象的 key 是本地的绑定名,value 是:
- 在可用的注入内容中搜索用的 key (字符串或 Symbol),或
- 一个对象,该对象的:
from属性是在可用的注入内容中搜索用的 key (字符串或 Symbol)default属性是降级情况下使用的 value
// 父级组件提供 'foo'
var Provider = {
  provide: {
    foo: 'bar'
  },
  // ...
}

// 子组件注入 'foo'
var Child = {
  inject: ['foo'],
  created () {
    console.log(this.foo) // => "bar"
  }
  // ...
}

// 使用一个注入的值作为一个属性的默认值:
const Child = {
  inject: ['foo'],
  props: {
    bar: {
      default () {
        return this.foo
      }
    }
  }
}

// 使用一个注入的值作为数据入口:
const Child = {
  inject: ['foo'],
  data () {
    return {
      bar: this.foo
    }
  }
}

// 设置默认值
const Child = {
  inject: {
    foo: { default: 'foo' }
  }
}

// 如果它需要从一个不同名字的属性注入,则使用 from 来表示其源属性:
const Child = {
  inject: {
    foo: {
      from: 'bar',
      default: 'foo'
    }
  }
}

// 与 prop 的默认值类似,你需要对非原始值使用一个工厂方法:

const Child = {
  inject: {
    foo: {
      from: 'bar',
      default: () => [1, 2, 3]
    }
  }
}
2
3
4
5
6
7
8
9
10
11
12
13
14
15
16
17
18
19
20
21
22
23
24
25
26
27
28
29
30
31
32
33
34
35
36
37
38
39
40
41
42
43
44
45
46
47
48
49
50
51
52
53
54
55
56
57
58
59
60
61
62
63
64
65
66
派发与广播 dispatch / broadcast
/**
 * 向下找到相应的组件,并由该组件去触发对应的事件
 * @param {String} componentName 组件名称
 * @param {String} eventName 事件名称
 * @param {Object} params 参数
 */
function broadcast(componentName, eventName, params) {
  this.$children.forEach(child => {
    var name = child.$options.componentName;

    if (name === componentName) {
      child.$emit.apply(child, [eventName].concat(params));
    } else {
      broadcast.apply(child, [componentName, eventName].concat([params]));
    }
  });
}
export default {
  methods: {
    /**
     * 向上找到对应的组件,并由该组件去触发对应的事件
     * @param {String} componentName 组件名称
     * @param {String} eventName 事件名称
     * @param {Object} params 参数
     */
    dispatch(componentName, eventName, params) {
      var parent = this.$parent || this.$root;
      var name = parent.$options.componentName;

      while (parent && (!name || name !== componentName)) {
        parent = parent.$parent;

        if (parent) {
          name = parent.$options.componentName;
        }
      }
      if (parent) {
        parent.$emit.apply(parent, [eventName].concat(params));
      }
    },
    broadcast(componentName, eventName, params) {
      broadcast.call(this, componentName, eventName, params);
    }
  }
};
2
3
4
5
6
7
8
9
10
11
12
13
14
15
16
17
18
19
20
21
22
23
24
25
26
27
28
29
30
31
32
33
34
35
36
37
38
39
40
41
42
43
44
45
https://github.com/ElemeFE/element/blob/dev/packages/radio/src/radio.vue#L128
找到任意组件实例——findComponents 系列方法
findComponents 系列方法最终都是返回组件的实例,进而可以读取或调用该组件的数据和方法。
它适用于以下场景:
- 由一个组件,向上找到最近的指定组件;
- 由一个组件,向上找到所有的指定组件;
- 由一个组件,向下找到最近的指定组件;
- 由一个组件,向下找到所有指定的组件;
- 由一个组件,找到指定组件的兄弟组件。
5 个不同的场景,对应 5 个不同的函数,实现原理也大同小异。
源码地址:https://github.com/icarusion/vue-component-book/blob/master/src/utils/assist.js 。
vuex
这个后面详细说明。
vue-router 路由
// 创建 router 实例,传入 routes 配置
const router = new Router({
  routes: [
    {
      path: '/',
      name: 'home',
      component: Home
      children: [
        {
          path: 'user',
          name: 'user',
          component: User
        },
        {
          path: 'about',
          components: { // 用于 命名视图
            default: side,
            main: main
          }
        }
      ]
    },
    ...
  ]
}

// 创建和挂载根实例。
// 记得要通过 router 配置参数注入路由,
// 从而让整个应用都有路由功能
const app = new Vue({
  router
}).$mount('#app')
2
3
4
5
6
7
8
9
10
11
12
13
14
15
16
17
18
19
20
21
22
23
24
25
26
27
28
29
30
31
32
路由参数
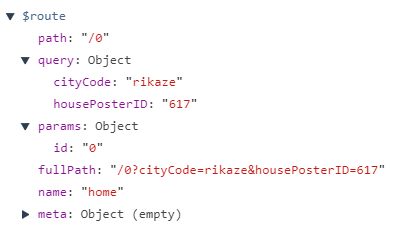
路由参数有 params 和 query 两种。
例如 http://localhost:8080/housePoster/#/0?cityCode=rikaze&housePosterID=617 :
...
routes: [
  ...
  {
    path: '/:id',
    name: 'home',
    component: Home
  }
  ...
]
...
2
3
4
5
6
7
8
9
10
11
参数值如下(在 Vue 实例内部,你可以通过 $route 访问路由参数。):
router-view
<router-view> 组件是一个 functional 组件,渲染路径匹配到的视图组件。
<router-view> 也是组件,可以配合 <transition> 和 <keep-alive> 使用。如果两个结合一起用,要确保在内层使用 <keep-alive>:
<transition>
  <keep-alive>
    <router-view></router-view>
  </keep-alive>
</transition>
2
3
4
5
<router-view> Props
name
如果 <router-view> 设置了名称,则会渲染对应的路由配置中 components 下的相应组件。
<router-view class="view one"></router-view>
<router-view class="view two" name="a"></router-view>
<router-view class="view three" name="b"></router-view>
2
3
const router = new VueRouter({
  routes: [
    {
      path: '/',
      components: {
        default: Foo,
        a: Bar,
        b: Baz
      }
    }
  ]
})
2
3
4
5
6
7
8
9
10
11
12
router-link
<router-link> 组件支持用户在具有路由功能的应用中 (点击) 导航。 通过 to 属性指定目标地址,默认渲染成带有正确链接的 <a> 标签,可以通过配置 tag 属性生成别的标签。
<router-link> 比起写死的 <a href="..."> 会好一些,理由如下:
- 无论是 HTML5 history 模式还是 hash 模式,它的表现行为一致,所以,当你要切换路由模式,或者在 IE9 降级使用 hash 模式,无须作任何变动。
- 在 HTML5 history 模式下,
router-link会守卫点击事件,让浏览器不再重新加载页面。 - 当你在 HTML5 history 模式下使用
base选项之后,所有的to属性都不需要写 (基路径) 了。
<router-link> Props
to
表示目标路由的链接。当被点击后,内部会立刻把 to 的值传到 router.push(),所以这个值可以是一个字符串或者是描述目标位置的对象。
<!-- 字符串 -->
<router-link to="home">Home</router-link>
<!-- 渲染结果 -->
<a href="home">Home</a>

<!-- 使用 v-bind 的 JS 表达式 -->
<router-link v-bind:to="'home'">Home</router-link>

<!-- 不写 v-bind 也可以,就像绑定别的属性一样 -->
<router-link :to="'home'">Home</router-link>

<!-- 同上 -->
<router-link :to="{ path: 'home' }">Home</router-link>

<!-- 命名的路由 -->
<router-link :to="{ name: 'user', params: { userId: 123 }}">User</router-link>

<!-- 带查询参数,下面的结果为 /register?plan=private -->
<router-link :to="{ path: 'register', query: { plan: 'private' }}">Register</router-link>
2
3
4
5
6
7
8
9
10
11
12
13
14
15
16
17
18
19
replace
设置 replace 属性的话,当点击时,会调用 router.replace() 而不是 router.push(),于是导航后不会留下 history 记录。
<router-link :to="{ path: '/abc'}" replace></router-link>
append
设置 append 属性后,则在当前 (相对) 路径前添加基路径。例如,我们从 /a 导航到一个相对路径 b,如果没有配置 append,则路径为 /b,如果配了,则为 /a/b
<router-link :to="{ path: 'relative/path'}" append></router-link>
tag
有时候想要 <router-link> 渲染成某种标签,例如 <li>。 于是我们使用 tag prop 类指定何种标签,同样它还是会监听点击,触发导航。
<router-link to="/foo" tag="li">foo</router-link>
<!-- 渲染结果 -->
<li>foo</li>
2
3
编程式的导航
点击 <router-link :to="..."> 等同于调用 router.push(...)。
| 声明式 | 编程式 |
|---|---|
<router-link :to="..."> | router.push(...) |
<router-link :to="..." replace> | router.replace(...) |
注意:在 Vue 实例内部,你可以通过 $router 访问路由实例。因此你可以调用 this.$router.push 。
// 字符串
router.push('home')

// 对象
router.push({ path: 'home' })

// 命名的路由
router.push({ name: 'user', params: { userId: '123' }})

// 带查询参数,变成 /register?plan=private
router.push({ path: 'register', query: { plan: 'private' }})
2
3
4
5
6
7
8
9
10
11
注意:如果提供了 path,params 会被忽略,上述例子中的 query 并不属于这种情况。取而代之的是下面例子的做法,你需要提供路由的 name 或手写完整的带有参数的 path:
const userId = '123'
router.push({ name: 'user', params: { userId }}) // -> /user/123
router.push({ path: `/user/${userId}` }) // -> /user/123
// 这里的 params 不生效
router.push({ path: '/user', params: { userId }}) // -> /user
2
3
4
5
注意: 如果目的地和当前路由相同,只有参数发生了改变 (比如从一个用户资料到另一个 /user/foo -> /user/bar),你需要使用 beforeRouteUpdate 来响应这个变化或者通过 watch (比如抓取用户信息),这个时候组件的生命周期钩子不会再被调用。
从 /user/foo 导航到 /user/bar,原来的组件实例会被复用。因为两个路由都渲染同个组件,比起销毁再创建,复用则显得更加高效。不过,这也意味着组件的生命周期钩子不会再被调用。
复用组件时,想对路由参数的变化作出响应的话,你可以简单地 watch (监测变化) $route 对象:
const User = {
  template: '...',
  watch: {
    '$route' (to, from) {
      // 对路由变化作出响应...
    }
  }
}
2
3
4
5
6
7
8
或者使用 beforeRouteUpdate 导航守卫:
const User = {
  template: '...',
  beforeRouteUpdate (to, from, next) {
    // react to route changes...
    // don't forget to call next()
  }
}
2
3
4
5
6
7
// 在浏览器记录中前进一步,等同于 history.forward()
router.go(1)
router.forward()

// 后退一步记录,等同于 history.back()
router.go(-1)
router.back()

// 前进 3 步记录
router.go(3)

// 如果 history 记录不够用,那就默默地失败呗
router.go(-100)
router.go(100)
2
3
4
5
6
7
8
9
10
11
12
13
14
滚动行为
新打开路由的时候希望回到页面顶部或者返回上个路由希望定位到上次浏览的地方。
...
scrollBehavior (to, from, savedPosition) {
  if (savedPosition) {
    return savedPosition
  } else {
    return { x: 0, y: 0 }
  }
}
...
2
3
4
5
6
7
8
9
路由懒加载
结合 Vue 的异步组件和 Webpack 的代码分割功能,轻松实现路由组件的懒加载。
const Foo = () => import('./Foo.vue')
有时候我们想把某个路由下的所有组件都打包在同个异步块 (chunk) 中。
const Foo = () => import(/* webpackChunkName: "group-foo" */ './Foo.vue')
const Bar = () => import(/* webpackChunkName: "group-foo" */ './Bar.vue')
const Baz = () => import(/* webpackChunkName: "group-foo" */ './Baz.vue')
2
3
路由元信息
路由元信息是指定义路由时配置的 meta 字段。
例如使用路由元信息指定页面 title :
const routes = [{
  path: "/home",
  name: "home",
  component: Home,
  meta: {
    title: '首页'
  }
}, {
  path: "/about",
  name: "about",
  component: About,
  meta: {
    title: '关于我们'
  }
}]

const router = new Router({
  routes,
  scrollBehavior (to, from, savedPosition) {
    if (savedPosition) {
      return savedPosition
    } else {
      return { x: 0, y: 0 }
    }
  }
})

router.beforeEach((to, from, next) => {
  const title = to.meta && to.meta.title;
  if (title) {
    document.title = title;
  }
  next();
});
2
3
4
5
6
7
8
9
10
11
12
13
14
15
16
17
18
19
20
21
22
23
24
25
26
27
28
29
30
31
32
33
34
Vuex
Vuex 应用的核心就是 store(仓库)。“store” 基本上就是一个容器,它包含着你的应用中大部分的状态 (state)。Vuex 和单纯的全局对象有以下两点不同:
- Vuex 的状态存储是响应式的。当 Vue 组件从 store 中读取状态的时候,若 store 中的状态发生变化,那么相应的组件也会相应地得到高效更新。
- 你不能直接改变 store 中的状态。改变 store 中的状态的唯一途径就是显式地提交 (commit) mutation。
看一幅经典图:

state
Vuex 的状态存储是响应式的,从 store 实例中读取状态最简单的方法就是在计算属性中返回某个状态。
vue 根实例中注册 store 选项,该 store 实例会注入到根组件下的所有子组件中,且子组件能通过 this.$store 访问到。
const Counter = {
  template: `<div>{{ count }}</div>`,
  computed: {
    count () {
      return this.$store.state.count
    }
  }
}
2
3
4
5
6
7
8
mapState 辅助函数
import { mapState } from 'vuex'

export default {
  // ...
  computed: {
  localComputed () { /* ... */ },
  // 使用对象展开运算符将此对象混入到外部对象中
  ...mapState({
    // 箭头函数可使代码更简练
    count: state => state.count,

    // 传字符串参数 'count' 等同于 `state => state.count`
    countAlias: 'count',

    // 为了能够使用 `this` 获取局部状态,必须使用常规函数
    countPlusLocalState (state) {
      return state.count + this.localCount
    }
  }),
  // 当映射的计算属性的名称与 state 的子节点名称相同时,我们也可以给 mapState 传一个字符串数组
  ...mapState(['pkUser', ...])
}
2
3
4
5
6
7
8
9
10
11
12
13
14
15
16
17
18
19
20
21
22
Getter
Getter 是从 state 中派生出的一些状态,就像计算属性一样,getter 的返回值会根据它的依赖被缓存起来,且只有当它的依赖值发生了改变才会被重新计算。
Getter 接受 state 作为其第一个参数,也可以接受其他 getter 作为第二个参数:
const store = new Vuex.Store({
  state: {
    todos: [
      { id: 1, text: '...', done: true },
      { id: 2, text: '...', done: false }
    ]
  },
  getters: {
    doneTodos: state => {
      return state.todos.filter(todo => todo.done)
    },
    doneTodosCount: (state, getters) => {
      return getters.doneTodos.length
    }
  }
})
2
3
4
5
6
7
8
9
10
11
12
13
14
15
16
在任何组件中使用它:
computed: {
  doneTodosCount () {
    return this.$store.getters.doneTodosCount
  }
}
2
3
4
5
mapGetters 辅助函数
import { mapGetters } from 'vuex'

export default {
  // ...
  computed: {
  // 使用对象展开运算符将 getter 混入 computed 对象中
    ...mapGetters([
      'doneTodosCount',
      'anotherGetter',
      // ...
    ])
    // 想将一个 getter 属性另取一个名字,使用对象形式:
    ...mapGetters({
      // 把 `this.doneCount` 映射为 `this.$store.getters.doneTodosCount`
      doneCount: 'doneTodosCount'
    })
  }
}
2
3
4
5
6
7
8
9
10
11
12
13
14
15
16
17
18
Mutation
更改 Vuex 的 store 中的状态的唯一方法是提交 mutation。Vuex 中的 mutation 非常类似于事件:每个 mutation 都有一个字符串的 事件类型 (type) 和 一个 回调函数 (handler)。这个回调函数就是我们实际进行状态更改的地方,并且它会接受 state 作为第一个参数:
const store = new Vuex.Store({
  state: {
    count: 1
  },
  mutations: {
    increment (state) {
      // 变更状态
      state.count++
    }
  }
})
2
3
4
5
6
7
8
9
10
11
你不能直接调用一个 mutation handler。这个选项更像是事件注册:“当触发一个类型为 increment 的 mutation 时,调用此函数。”要唤醒一个 mutation handler,你需要以相应的 type 调用 store.commit 方法:
store.commit('increment')
提交载荷(Payload)
载荷传参数
// ...
mutations: {
  increment (state, n) {
    state.count += n
  }
}
1
2
3
4
5
6store.commit('increment', 10)1载荷传对象
// ...
mutations: {
  increment (state, payload) {
    state.count += payload.amount
  }
}
1
2
3
4
5
6store.commit('increment', { amount: 10 })1
2
3
注意事项
- Mutation 需遵守 Vue 的响应规则
- Mutation 必须是同步函数
mapMutations 辅助函数
import { mapMutations } from 'vuex'

export default {
  // ...
  methods: {
    ...mapMutations([
      'increment', // 将 `this.increment()` 映射为 `this.$store.commit('increment')`

      // `mapMutations` 也支持载荷:
      'incrementBy' // 将 `this.incrementBy(amount)` 映射为 `this.$store.commit('incrementBy', amount)`
    ]),
    ...mapMutations({
      add: 'increment' // 将 `this.add()` 映射为 `this.$store.commit('increment')`
    })
  }
}
2
3
4
5
6
7
8
9
10
11
12
13
14
15
16
Action
Action 类似于 mutation,不同在于:
- Action 提交的是 mutation,而不是直接变更状态。
- Action 可以包含任意异步操作。
Action 函数接受一个与 store 实例具有相同方法和属性的 context 对象,因此你可以调用 context.commit 提交一个 mutation,或者通过 context.state 和 context.getters 来获取 state 和 getters。
const store = new Vuex.Store({
  state: {
    count: 0
  },
  mutations: {
    increment (state) {
      state.count++
    }
  },
  actions: {
    increment (context) {
      context.commit('increment')
    },
    // 参数解构
    increment ({ commit }) {
      commit('increment')
    }
  }
})
2
3
4
5
6
7
8
9
10
11
12
13
14
15
16
17
18
19
Action 通过 store.dispatch 方法触发:
store.dispatch('increment')
提交载荷
store.dispatch('incrementAsync', {
  amount: 10
})
2
3
mapActions 辅助函数
import { mapActions } from 'vuex'

export default {
  // ...
  methods: {
    ...mapActions([
      'increment', // 将 `this.increment()` 映射为 `this.$store.dispatch('increment')`

      // `mapActions` 也支持载荷:
      'incrementBy' // 将 `this.incrementBy(amount)` 映射为 `this.$store.dispatch('incrementBy', amount)`
    ]),
    ...mapActions({
      add: 'increment' // 将 `this.add()` 映射为 `this.$store.dispatch('increment')`
    })
  }
}
2
3
4
5
6
7
8
9
10
11
12
13
14
15
16
注意:store.dispatch 可以处理被触发的 action 的处理函数返回的 Promise,并且 store.dispatch 仍旧返回 Promise。
actions: {
  actionA ({ commit }) {
    return new Promise((resolve, reject) => {
      setTimeout(() => {
        commit('someMutation')
        resolve()
      }, 1000)
    })
  }
}
2
3
4
5
6
7
8
9
10
store.dispatch('actionA').then(() => {
  // ...
})
2
3
actions: {
  // ...
  actionB ({ dispatch, commit }) {
    return dispatch('actionA').then(() => {
      commit('someOtherMutation')
    })
  }
}
2
3
4
5
6
7
8
// 假设 getData() 和 getOtherData() 返回的是 Promise

actions: {
  async actionA ({ commit }) {
    commit('gotData', await getData())
  },
  async actionB ({ dispatch, commit }) {
    await dispatch('actionA') // 等待 actionA 完成
    commit('gotOtherData', await getOtherData())
  }
}
2
3
4
5
6
7
8
9
10
11